



How to Set Up Inventory Accounting in Your Accounting Software
If you’ve ever stared at a pile of products and wondered, “How on earth do I track all of this in my books?”, you’re not alone. Set Up Inventory Accounting in Your Accounting Software is one of those tasks that sounds intimidating but becomes completely manageable once you understand the basics. Whether you’re running a small retail shop, an ecommerce store, or a growing product-based business, getting your inventory accounting set up correctly from the start can save you serious headaches (and money) down the road.
In this guide, we’ll walk through everything you need to know to set up inventory accounting in your accounting software, step by step.

Why Right Set Up for Inventory Accounting Actually Matters
Before we dive into the how, let’s talk about the why, because this isn’t just a bookkeeping formality.
Inventory is typically one of the largest assets on a product-based business’s balance sheet. In the U.S., the average small retailer ties up roughly 20–30% of their total capital in inventory. If you’re not tracking it properly in your accounting software, you risk:
- Overstating profits by not accounting for the cost of goods sold (COGS)
- Paying too much in taxes because your taxable income is miscalculated
- Running out of stock without realizing it, or overstocking and tying up cash
- Failing an audit if your inventory records don’t match your financial statements
Good inventory accounting gives you a clear picture of what you have, what it cost you, and what it’s worth. It connects your warehouse to your wallet.
Step 1: Choose the Right Inventory Accounting Method
This is the foundation everything else is built on. Before you touch your accounting software, you need to decide which inventory costing method you’ll use. The IRS recognizes several, but these three are the most common for U.S. businesses:
FIFO (First In, First Out)
With FIFO, you assume the oldest inventory you purchased is the first to be sold. This is the most popular method in the U.S. and often makes the most intuitive sense—especially for perishable goods or anything with a shelf life. During periods of inflation, FIFO tends to show higher profits because older, cheaper inventory is being “sold” first.
LIFO (Last In, First Out)
LIFO assumes your most recently purchased inventory is sold first. It’s only allowed under U.S. GAAP (not IFRS), which means it’s a uniquely American option. During inflation, LIFO results in lower taxable income because higher-cost recent inventory hits COGS first. However, note that LIFO is not permitted under international accounting standards, so if you ever expand globally, this could become a complication.
Weighted Average Cost
This method averages out the cost of all your inventory over a period. It smooths out price fluctuations and is simpler to manage, making it a solid choice for businesses with large volumes of similar items.
Pro tip: Talk to your CPA before locking in a method. Once you choose one and file taxes using it, switching requires IRS approval via Form 3115.
Learn more about IRS guidance on inventory methods here.
Step 2: Set Up Inventory Accounting in Your Accounting Software
Now that you’ve chosen your method, it’s time to get your hands on the actual software. Most popular U.S. accounting platforms like QuickBooks, Xero, FreshBooks, Wave, and Zoho Books have built-in inventory management features, though the depth varies by plan and platform.
Here’s a general inventory setup process that applies across most software:
Enable Inventory Tracking
First things first: make sure inventory tracking is turned on. In QuickBooks Online, for example, you’d go to Settings → Account and Settings → Sales and toggle on “Track inventory quantity on hand.” Other platforms have similar toggles, often under “Products & Services” or “Items.”
Create Your Inventory Items
For each product you sell, you’ll create an item record that typically includes:
- Item name and description — what you’re selling
- SKU or product code — your internal reference number
- Unit of measure — each, box, pound, etc.
- Purchase cost — what you paid per unit
- Sales price — what you charge customers
- Quantity on hand — how many you currently have
- Reorder point — the quantity at which you want to be alerted to reorder
Take your time here. Garbage in, garbage out. If your item records are sloppy, your reports will be too.
Link to the Right Accounts
Each inventory item needs to be connected to the correct accounts in your chart of accounts:
- Inventory Asset account — tracks the value of unsold inventory on your balance sheet
- COGS account — records the cost of goods when items are sold
- Income account — records revenue from sales
Most software will have these accounts pre-built or will create them automatically when you enable inventory tracking. Still, double-check that everything is mapped correctly, especially if you’re using a customized chart of accounts.
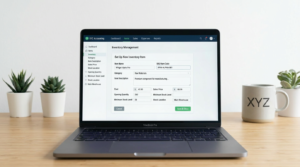
Step 3: Enter Your Starting Inventory (Opening Balance)
Here’s the step people most often skip—and regret later. If you’re switching from another system or setting up inventory accounting for the first time in an existing business, you need to enter your opening inventory balance.
This means recording the quantity and cost of every item you currently have on hand as of your start date. Most accounting software handles this through an “inventory adjustment” transaction or an opening balance entry linked to your inventory asset account.
Be as accurate as possible here. If you’re unsure of exact costs, use your most recent purchase invoices or supplier pricing. A physical count of your stock before entering data is strongly recommended, yes, even if it means spending a Saturday afternoon in the stockroom.
Step 4: Sync Your Sales and Purchasing Workflows
Once your inventory is set up, the magic happens when your day-to-day transactions automatically update your inventory records.
Sales Side
When you create an invoice or record a sale, your accounting software should automatically reduce the quantity on hand for the items sold and record the appropriate COGS. Make sure every sale goes through the system don’t bypass it by recording sales as lump-sum bank deposits without itemizing what was sold.
Purchasing Side
When you receive new inventory, record it through a purchase order or bill in your software. This increases your inventory asset account and sets up the accounts payable entry if you haven’t paid yet. Receiving inventory without recording it is one of the most common reasons businesses find their books don’t match their shelves.
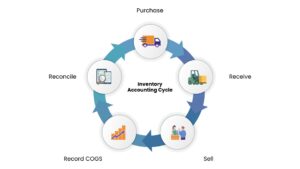
Step 5: Reconcile and Review Regularly
Set up for inventory accounting isn’t a one-and-done deal. You need to maintain it, and that means regular reconciliation.
At least once a quarter, monthly if your volume is high, do the following:
Run an inventory valuation report. This shows the quantity and value of every item you have on hand. Compare it to your actual physical count. Discrepancies happen due to theft, damage, data entry errors, or simple miscounts. When you find them, record an inventory adjustment in your software to correct the books.
Review your COGS margin. Your COGS as a percentage of revenue should stay relatively consistent. A sudden spike or drop often signals a data entry problem, pricing issue, or inventory shrinkage worth investigating.
Check for negative inventory. Some software allows quantities to go negative, which is a red flag. It usually means sales are being recorded before purchases are entered, and it can throw off your financials significantly.
Check out QuickBooks inventory reconciliation walkthrough here.
Conclusion
Setting up inventory accounting in your accounting software doesn’t have to be overwhelming. Once you choose the right costing method, build out your items carefully, enter your opening balances, and stay on top of reconciliations, the whole system starts working for you instead of against you. Your financials get more accurate, tax season gets less stressful, and you actually know what’s happening in your business.
If you’re ready to take control of your inventory management, start with Step 1 today pick your costing method and check whether your current accounting software plan includes full inventory tracking. And if you’re not sure your current setup is working correctly, it’s always worth a conversation with your accountant before problems pile up.
Need help choosing the right accounting software for your inventory needs? Book a Free 30 minute Consultation Call with our Inventory Accounting Experts.